


Photo by Sebastian DC on Unsplash
How AAA Studios create solid foundations from scratch in their RPGs Character DNA


If you're a fellow developer in AAA Studios or well organized Game Studio team, you are probably familiar with what I'm about to share, nevertheless, I'm sharing it here to help anyone pursuing a career in game development understand why it is crucial to use architected solutions, especially for games you plan to make to sell commercially, or even just have your code scalable, without breaking things every time you add a new feature.
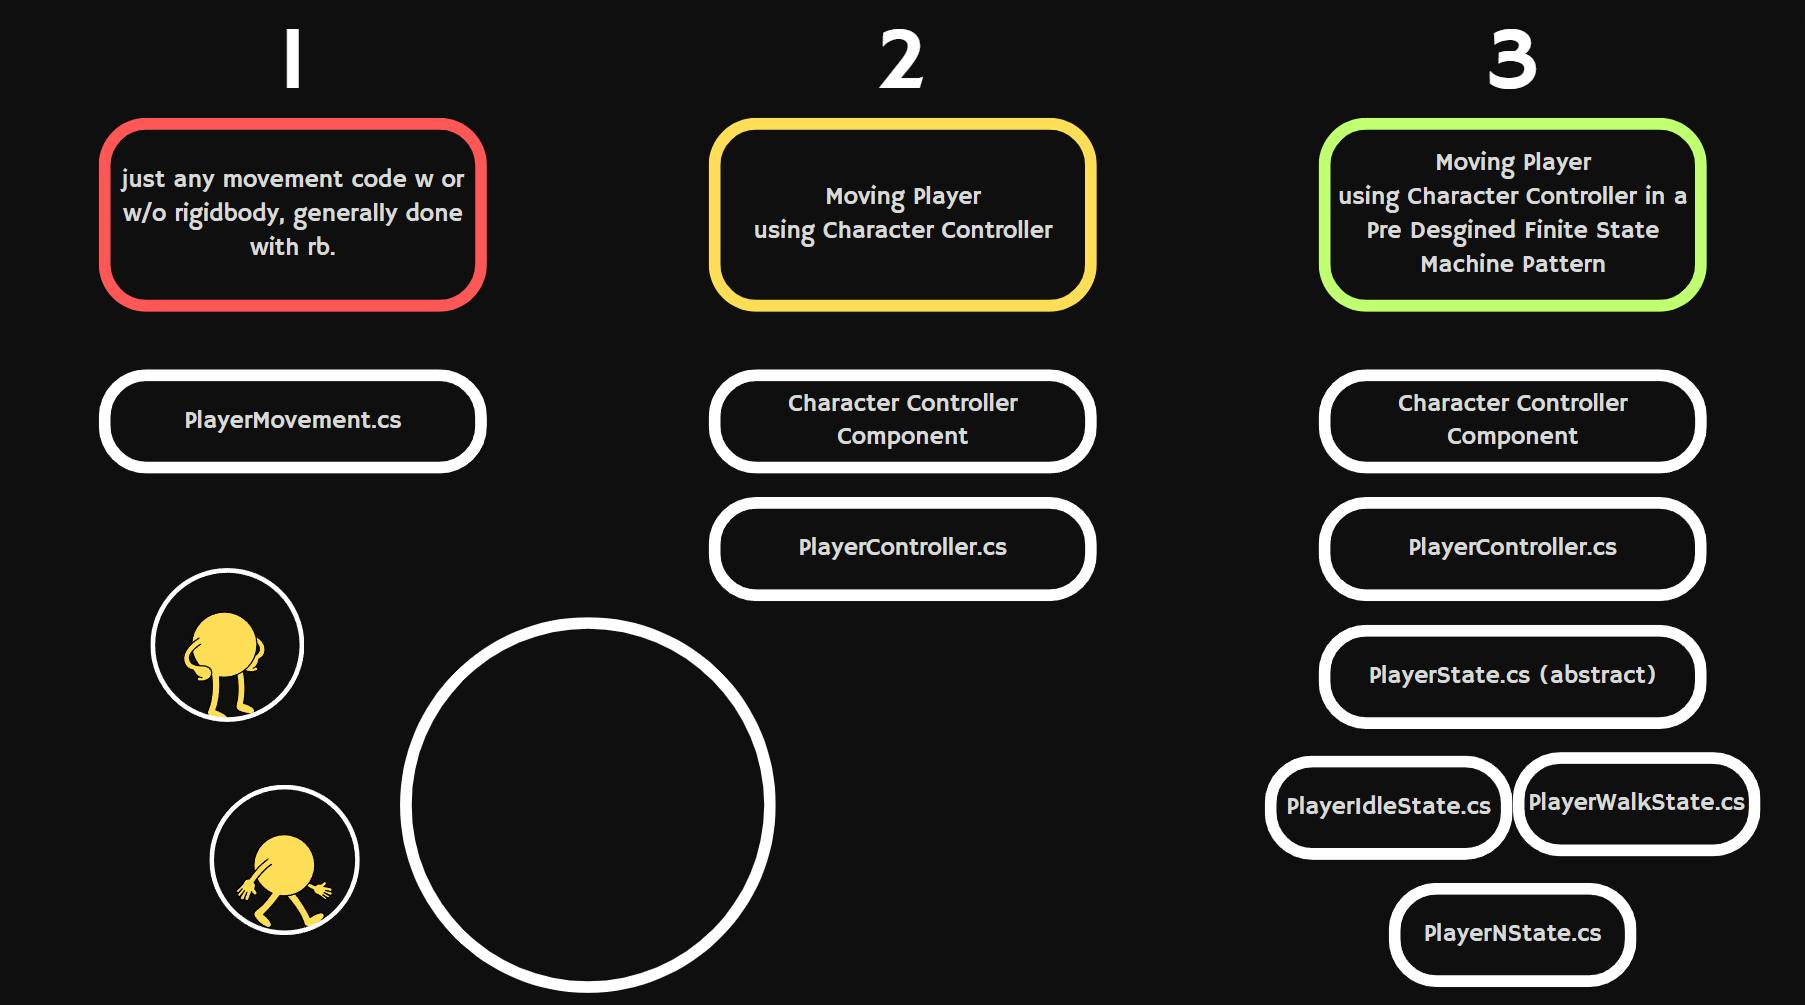
I'm going to demonstrate in super simple layman's terms with 3 different code styles, to move our protagonist.
PlayerMovement.cs
PlayerController.cs
PlayerController_FSM.cs
To help in visualizing the above 3 code styles, I've created this barebone infographic below:
Before proceeding, I want to let you know that I've used Unity Engine with C# in Visual Code for this, so it is targeted towards people who use Unity or have used Unity in the past. However, since it is more of a design logic that I'm trying to portray and explain here, it is transferable to other Game Engines like Unreal Engine, Godot, etc.
PlayerMovement.cs
using UnityEngine;

public class PlayerMovement : MonoBehaviour
{
    public float speed = 5f;

    void Update()
    {
        // Get input axes
        float horizontalInput = Input.GetAxis("Horizontal"); //A & D key input
        float verticalInput = Input.GetAxis("Vertical"); // W &S key input

        // Calculate movement direction
        Vector3 movement = new Vector3(horizontalInput, 0f, verticalInput).normalized;

        // Move the player
        MovePlayer(movement);
    }

    void MovePlayer(Vector3 direction)
    {
        // Calculate the movement amount
        Vector3 movementAmount = direction * speed * Time.deltaTime;

        // Move the player
        transform.Translate(movementAmount, Space.World);
    }
}
If you are new to Gamedev, you might be familiar with PlayerMovement.cs . where you attach the PlayerMovement.cs script to your protagonist, and use Translate() to move your player (even though there are other methods as well to move a game object, but here we will use Translate() for simplicity), along with a rigid body component attached to the Protagonist. You can move around using WASD Keys.
Assuming you already have a simple GameObject model (as simple as a Cube),
The Steps to move your Protagonist using Translate():
Step 1: Attach the above PlayerMovement.cs script to your GameObject.
Step 2: Add a Rigidbody component.
Step 3: Press Play, and move using WASD.
If you're quickly prototyping a small game for game jam or just for fun, where your protagonist just needs to move as told, this is well and good to use.
PlayerController.cs [ + Character Controller Component]
 using UnityEngine;

 public class PlayerController : MonoBehaviour
 {
     public float speed = 5f;
     private CharacterController controller;

     void Start()
     {
         // Get the CharacterController component on the same GameObject
         controller = GetComponent<CharacterController>();
     }

     void Update()
     {
         // Get input axes
         float horizontalInput = Input.GetAxis("Horizontal");
         float verticalInput = Input.GetAxis("Vertical");

         // Calculate movement direction
         Vector3 movement = new Vector3(horizontalInput, 0f, verticalInput).normalized;

         // Move the player
         MovePlayer(movement);
     }

     void MovePlayer(Vector3 direction)
     {
         // Calculate the movement amount
         Vector3 movementAmount = direction * speed * Time.deltaTime;

         // Move the player using CharacterController
         controller.Move(movementAmount);
     }
 }
If you have been around the game dev scene then you probably are aware of Character Controllers and the benefits of using them for complete character control and implementing your custom physics, from custom gravity to levitating powers to superhuman strength.
The beauty of CC is that whether your protagonist is an old man or programming a Superhero, character controllers are so versatile that they are used in basically almost all RPGs because of their ability to DIY your character from scratch. Now, it does take more time to code your little custom "physics" systems around the character controller, but if you are looking for extreme control then this is the one for you.
Assuming you already have a simple GameObject model (as simple as a Cube), The Steps to move your Protagonist using A Character Controller:
Step 1: Attach the above PlayerController.cs script to your GameObject.
Step 2: Add a Character Controller component.
Step 3: Press Play, and move using WASD.
That's it, congrats!
This pattern has been observed from game jams to even commercial games, but there is a better way to do it, that is scalable and doesn't break your code on every little change, imagine you have to add an extra superpower to your superhero, there are chances you would have to redo your code and the number of bugs you would produce would make it frustrating and to question your career in the gaming industry altogether, to say the least.
To minimize these risks and stay on top of our code logic from the beginning, let me introduce you to the method that I swear by,
PlayerController_FSM.cs [+ Character Controller Component + PlayerState.cs + N States]
```plaintext //For Player Control. Acts like a little brain using other states through this script. using UnityEngine;
public class PlayerController_FSM : MonoBehaviour { public static PlayerController_FSM ins; [Header("State System")] private PlayerState currentState; public readonly PlayerIdleState idleState = new PlayerIdleState(); public readonly PlayerWalkState walkState = new PlayerWalkState(); public readonly PlayerFlyState flyState = new PlayerFlyState();
[Header("Player Movement controls")] public float walkSpeed = 5f; private CharacterController controller;
//Add gravity public float gravity = 10.0f; //9.8 but for sake of simplicity we will use 10. //Add Flying power public float flyPower = 2.0f; private float verticalVelocity;
void Awake() { ins= this; } void Start() { // Get the CharacterController component on the same GameObject controller = GetComponent(); TransitionToState(idleState); //to start our player in idle state. }
void Update() { currentState.Update(this); }
private void OnCollisionEnter(Collision other) { currentState.OnCollisionEnter(this, other); }
public void TransitionToState(PlayerState state) { currentState = state; currentState.EnterState(this); }
private void OnTriggerEnter(Collider other) { currentState.OnTriggerEnter(this, other); }
private void OnTriggerStay(Collider other) { currentState.OnTriggerStay(this, other); }
private void OnTriggerExit(Collider other) { currentState.OnTriggerExit(this, other); }
#region Player Walk Movement
public void PlayerWalkMovement() //called from our different player states. { // Get input axes float horizontalInput = Input.GetAxis("Horizontal"); float verticalInput = Input.GetAxis("Vertical");
// Calculate movement direction Vector3 movement = new Vector3(horizontalInput, 0f, verticalInput).normalized;
// Move the player MovePlayer(movement); //Rotate the player RotatePlayer(movement); }
void MovePlayer(Vector3 direction) { // Calculate the movement amount Vector3 movementAmount = direction walkSpeed Time.deltaTime;
// Apply gravity ApplyGravity();
// Combine movement with gravity movementAmount += Vector3.up verticalVelocity Time.deltaTime;
// Move the player using CharacterController controller.Move(movementAmount);
} void RotatePlayer(Vector3 direction) { // Rotate the player to face the movement direction if (direction != Vector3.zero) { Quaternion toRotation = Quaternion.LookRotation(direction, Vector3.up); transform.rotation = Quaternion.RotateTowards(transform.rotation, toRotation, 360f 2 Time.deltaTime); } }
#endregion
#region Player Idle Movement
public void PlayerStoppedAndGrounded()
{
//Apply Gravity
ApplyGravity();
// Combine movement with gravity Vector3 movementAmount = Vector3.up verticalVelocity Time.deltaTime;
// Move the player using CharacterController controller.Move(movementAmount); }
#endregion
#region Player Fly Movement public void PlayerFlyMovement() //called from our different player states. { // Get input axes float horizontalInput = Input.GetAxis("Horizontal"); float verticalInput = Input.GetAxis("Vertical");
// Calculate movement direction Vector3 movement = new Vector3(horizontalInput, 0f, verticalInput).normalized;
// Move the player FlyPlayer(movement); //Rotate the player RotatePlayer(movement); }
void FlyPlayer(Vector3 direction) { // Calculate the movement amount Vector3 movementAmount = direction walkSpeed Time.deltaTime;
// Apply Fly Fly();
// Combine movement with gravity movementAmount += Vector3.up verticalVelocity Time.deltaTime;
// Move the player using CharacterController controller.Move(movementAmount);
} void FRotatePlayer(Vector3 direction) { // Rotate the player to face the movement direction if (direction != Vector3.zero) { Quaternion toRotation = Quaternion.LookRotation(direction, Vector3.up); transform.rotation = Quaternion.RotateTowards(transform.rotation, toRotation, 360f 2 Time.deltaTime); } }
#endregion
void ApplyGravity() { // Apply custom gravity if (!controller.isGrounded) { verticalVelocity -= gravity * Time.deltaTime; } else { // Reset vertical velocity when grounded verticalVelocity = -0.0f; } }
void Fly() { // Apply custom gravity if (!controller.isGrounded) { verticalVelocity += flyPower * Time.deltaTime; } else { // Reset vertical velocity when grounded verticalVelocity = -0.0f; } } }
    3.1 PlayerState.cs


```plaintext
using System.Collections;
using System.Collections.Generic;
using UnityEngine;

public abstract class PlayerState
// Start is called before the first frame update
{
    public abstract void EnterState(PlayerController_FSM playerfsm);
    public abstract void Update(PlayerController_FSM playerfsm);
    public abstract void FixedUpdate(PlayerController_FSM playerfsm);
    public abstract void OnCollisionEnter(PlayerController_FSM playerfsm, Collision other);
    public abstract void OnTriggerEnter(PlayerController_FSM playerfsm, Collider other);
    public abstract void OnTriggerStay(PlayerController_FSM playerfsm,Collider other);
    public abstract void OnTriggerExit(PlayerController_FSM playerfsm, Collider other);
}
PlayerIdleState.cs
using System.Collections;
using System.Collections.Generic;
using UnityEngine;

public class PlayerIdleState : PlayerState
{
    public override void EnterState(PlayerController_FSM playerfsm)
    {
        Debug.Log("Player Idle State Entered");
        //insert idle animation
    }
    public override void OnCollisionEnter(PlayerController_FSM playerfsm, Collision other)
    {

    }
    public override void Update(PlayerController_FSM playerfsm)
    {
        Debug.Log("Player Idle State Entered");
       if(Input.GetKeyDown(KeyCode.I)){
        Debug.Log("I is pressed");
        playerfsm.TransitionToState(playerfsm.walkState);
       }
       playerfsm.PlayerStoppedAndGrounded();
    }
    public override void FixedUpdate(PlayerController_FSM playerfsm)
    {

    }
    public override void OnTriggerEnter(PlayerController_FSM playerfsm, Collider other)
    {

    }
    public override void OnTriggerStay(PlayerController_FSM playerfsm, Collider other)
    {

    }

    public override void OnTriggerExit(PlayerController_FSM playerfsm, Collider other)
    {

    }

}
PlayerWalkState.cs
using System.Collections;
using System.Collections.Generic;
using UnityEngine;

public class PlayerWalkState : PlayerState
{
    public override void EnterState(PlayerController_FSM playerfsm)
    {
        Debug.Log("Player Walk State Entered");
        //start walk animation
    }
    public override void OnCollisionEnter(PlayerController_FSM playerfsm, Collision other)
    {

    }
    public override void Update(PlayerController_FSM playerfsm)
    {
             Debug.Log("Player Walk State Entered");
             if(Input.GetKeyDown(KeyCode.I)){
                Debug.Log("I is pressed");
                playerfsm.TransitionToState(playerfsm.idleState);
            }

            playerfsm.PlayerWalkMovement();

    }
    public override void FixedUpdate(PlayerController_FSM playerfsm)
    {

    }
    public override void OnTriggerEnter(PlayerController_FSM playerfsm, Collider other)
    {

    }
    public override void OnTriggerStay(PlayerController_FSM playerfsm, Collider other)
    {

    }

    public override void OnTriggerExit(PlayerController_FSM playerfsm, Collider other)
    {

    }

}
To keep it simple, this is a pattern that most experienced Game Studios use and even though there is some setup time to it, it helps keep things segregated using Player States, and at any given point in time our player can only be in 1 state, i.e., either he is in walkState or idleState or jumpState etc. This pattern is also called Finite State Machine Pattern and in my opinion, it is gold for us game developers. Whether you are a developer or game designer, you need to try it out once and compare the differences, then once you start adding more to your RPG character, you will realize how things start breaking and how this pattern minimizes a lot of headaches.
People also use enums, since enums are also very handy in this logic, but what I've shared here is the proper way to start your RPG Character Movement from scratch. There is more to it, I couldn't just fit in this but I hope you get the logic, so please do your study in depth.
Assuming you already have a simple GameObject model (as simple as a Cube), The Steps to move your Protagonist using A Character Controller:
Step 1: Attach the above PlayerController_FSM.cs script to your GameObject.
Step 2: Add a Character Controller component.
Step 3: Press Play, and move using WASD. By default you will be in an idle state, press "i" to switch to the walk state and then WASD to move, then to go back to the idle state, press "i" again and you are back to the idle state.
That's it, congrats!
Who should use this?
If you are planning to sell your game on Steam (or any platform) and scale well ahead along with DLCs, i.e., new characters, skins, powers, mechanics, etc.. or simply want to impress AAA studios with a little RPG project of your own, this will come in handy.
Having said that, I have also videofied this explanation, which unfortunately took some time, as it is a 1-hour long video session, but I still did it since videos help to understand better for some as well if anyone is interested.
Thank you for your time guys.
Happy Game Dev'ving!
Karanveer
Unit Codes